How to Make a Round Face Look Slim and Defined — Step-by-Step Pro Guide
Introduction — Understanding Round Face Makeup
A round face shape is naturally soft, full, and youthful — and there is so much beauty in that. But if you have ever looked in the mirror and wished for more definition, sharper cheekbones, or a more structured jawline, you are not alone. The right round face makeup tips can create exactly that — without surgery, filters, or expensive treatments.
Makeup is one of the most powerful tools for reshaping how your face appears. With the right placement of contour, blush, and highlight, you can visually slim and define a round face in just a few minutes. And the best part? Anyone can learn these techniques, even complete beginners.
In this guide, you will learn everything: what defines a round face, the three core makeup techniques for definition, a step-by-step daily routine, affordable product picks, and the most common mistakes to avoid. Let us get started.
💡 Pro Tip: Save this guide — you will want to come back to the placement diagrams as you practice each technique!
What Is a Round Face Shape?
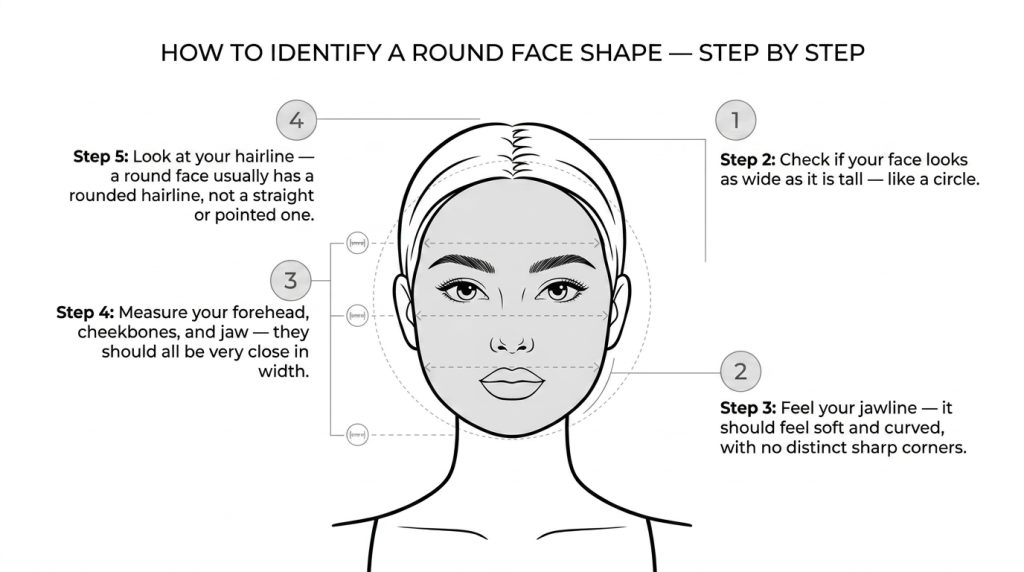
Before learning the techniques, it helps to confirm whether you actually have a round face shape. Here are the key characteristics:
- The width and length of your face are roughly equal
- You have soft, full cheeks with no strong angles
- Your jawline is rounded and gently curved, not pointed or square
- Your forehead is wide and rounded at the hairline
- The widest point of your face is through the cheeks
If most of these apply to you, you have a round face shape. The good news is that your face has a naturally youthful and approachable appearance. Makeup techniques simply add the definition and structure that your bone structure does not emphasize on its own.
Round Face Makeup Tips: 3 Core Techniques
Everything in round face makeup comes down to three techniques working together. Master these three and your entire look will transform.
Technique 1 — Contouring for Definition
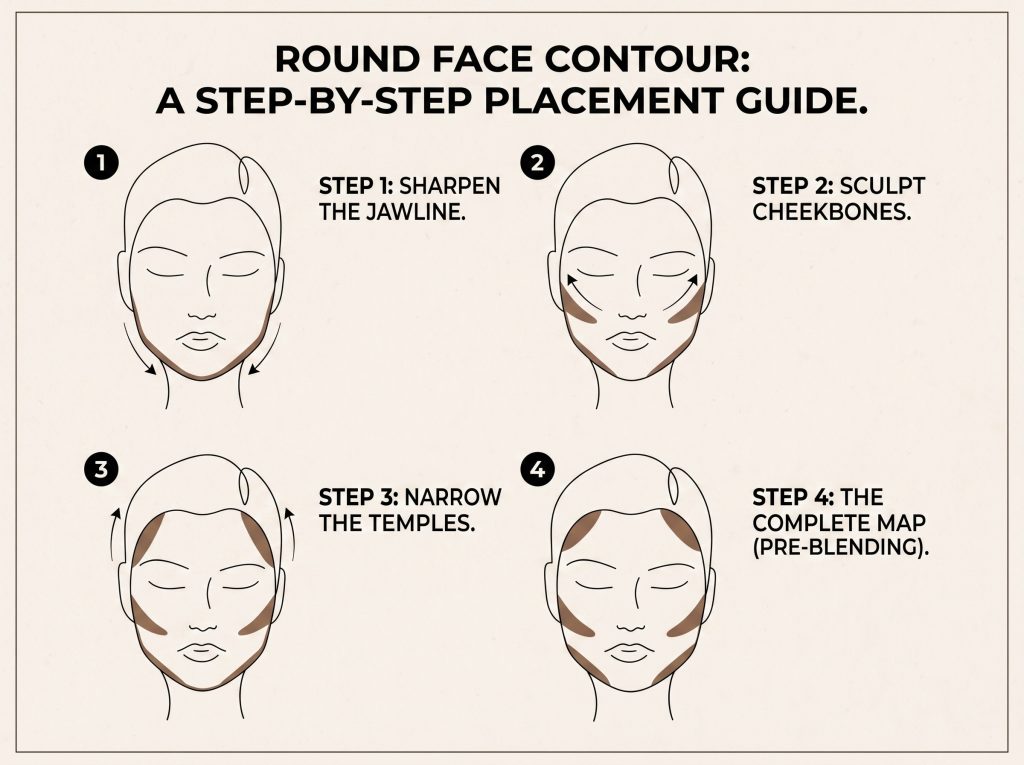
Contouring is the single most important step for making a round face look slimmer. It works by creating shadow in specific areas, which makes those areas appear to recede — giving your face the illusion of sharper angles.
Here is exactly where to apply contour on a round face:
- Below the cheekbones — starting from the ear and blending inward toward the nose (stop halfway, never go all the way to the nose)
- Along the jawline — a soft shadow along the jaw adds definition and reduces roundness
- On the sides of the forehead — this narrows a wide, rounded forehead
- Down the sides of the nose — optional, but adds length and structure to the center of the face
Always use a matte contour product — never shimmer or bronzer for contouring. Shimmer reflects light and makes areas appear larger, which is the opposite of what you want.
💡 Pro Tip: Blend your contour upward toward the temples, never downward. Downward blending pulls the face down and makes it look wider and heavier.
Technique 2 — Blush Placement for a Lifted Look
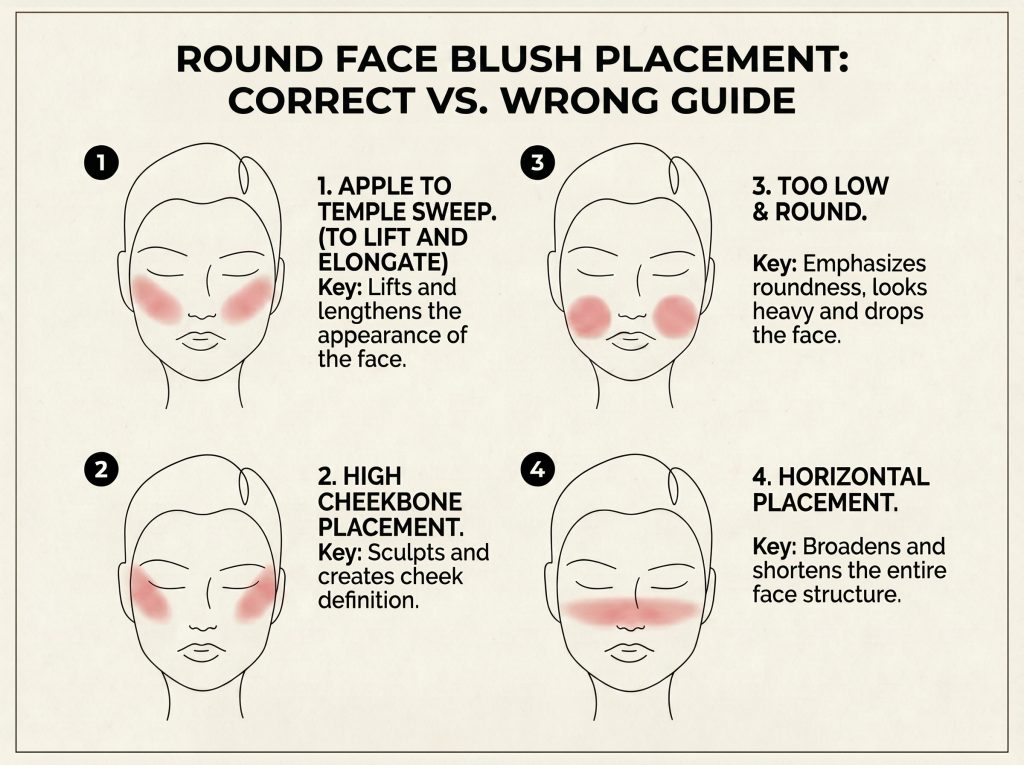
Blush placement can either make your face look rounder or create a beautiful lifted effect — it all depends on where you apply it.
Wrong placement (makes face rounder):
- Applying blush directly on the apples of the cheeks creates a round, doll-like look that emphasizes the width of the face
Correct placement (creates lift and definition):
- Apply blush higher on the cheekbones — starting just below the outer corner of the eye
- Blend diagonally upward toward the temples in a sweeping motion
- The highest point of blush should reach toward the top of the ear
- Keep the center of the face (near the nose) blush-free
This diagonal placement creates a visual lift that draws the eye upward and outward, making the face appear longer and more defined rather than wide and round.
💡 Pro Tip: Choose blush shades in peach, rose, or soft coral tones — these add warmth without emphasizing roundness. Avoid overly bright or pink shades directly on the cheeks.
Technique 3 — Highlighting the Right Zones
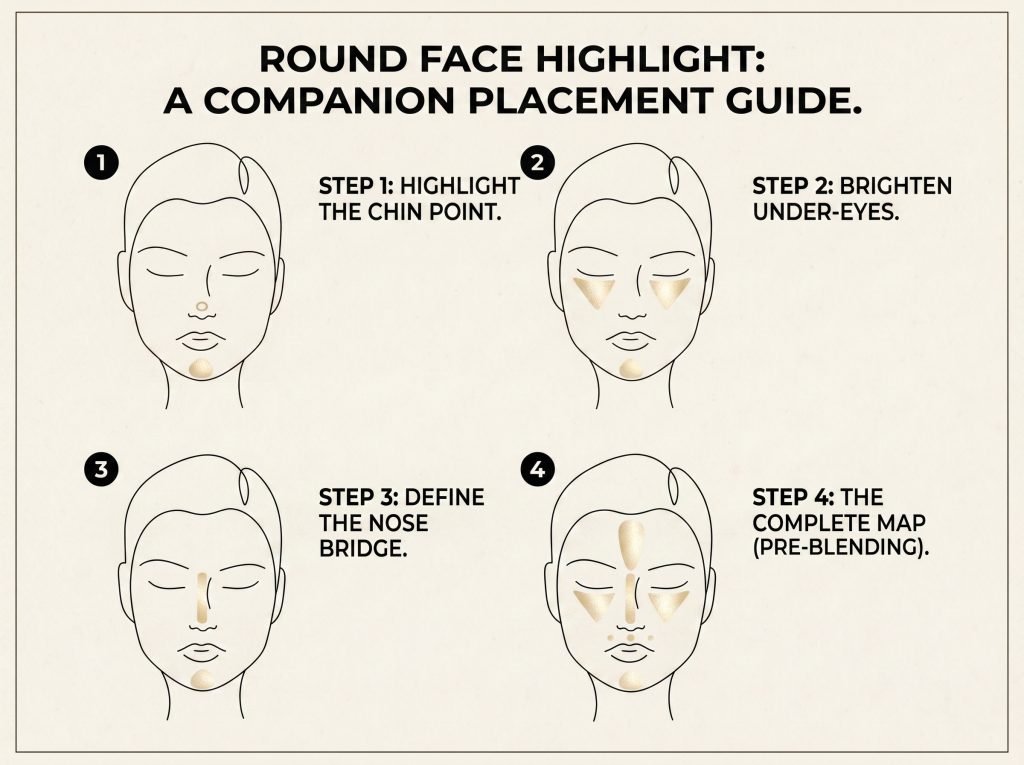
Highlight draws attention to areas where light hits the face — making those features appear more prominent. For round faces, strategic highlighting is about creating contrast with your contour, not lighting up the entire face.
Where to highlight on a round face:
- The center of the forehead — draws attention upward and adds length
- The bridge of the nose — creates the illusion of a longer, more defined nose
- The brow bone — lifts the eye area and adds structure
- The cupid’s bow — gives definition to the lip without making the face wider
Where NOT to highlight on a round face:
- The wide center of the cheeks — this emphasizes fullness
- The sides of the face — this makes the face appear wider
💡 Pro Tip: Use a subtle, finely milled highlighter rather than a chunky glitter. A natural glow effect looks more convincing and flattering than an obvious shimmer.
Step-by-Step Makeup Routine for Round Face
Now that you understand the three core techniques, here is a complete step-by-step routine that puts it all together:
Step 1 — Prep and Base
A smooth, well-prepped base makes every technique more effective and longer-lasting.
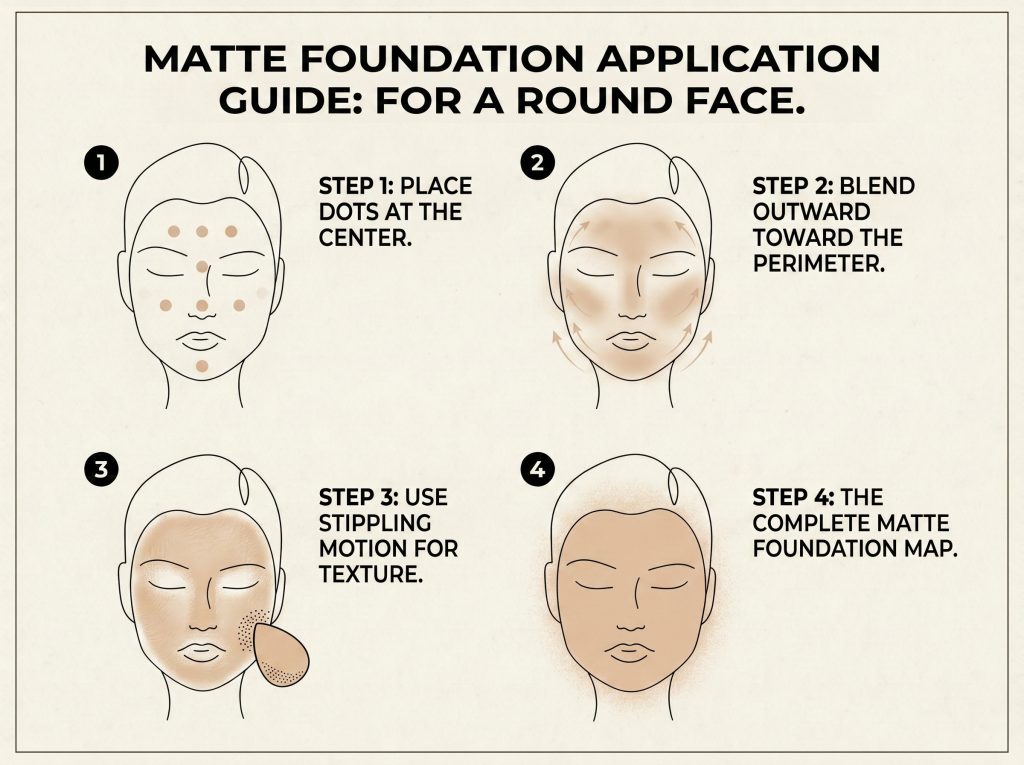
- Apply a pore-minimizing primer all over the face and allow it to set for 60 seconds
- Choose a matte or satin foundation — avoid dewy finishes as they make the face look fuller
- Apply foundation with a flat brush or damp sponge, blending outward from the center of the face
- Use concealer under the eyes and on any blemishes — blend until seamless
- Set with a matte translucent powder, focusing on the T-zone and cheeks
💡 Pro Tip: A matte finish foundation is your best friend for a round face — it controls shine and prevents the face from looking fuller under light.
Step 2 — Contour, Blush, and Highlight
- Apply matte contour powder below the cheekbones, blending upward toward temples
- Add a soft contour line along the jawline and blend downward onto the neck
- If desired, lightly contour the sides of the forehead near the hairline
- Apply blush high on the cheekbones, blending diagonally toward the temples
- Add highlight to the nose bridge, brow bone, and center of the forehead
- Step back and check everything in natural light — blend any harsh lines
💡 Pro Tip: Always build contour and blush gradually in thin layers. It is much easier to add more product than to remove too much.
Step 3 — Eye Makeup for Round Face
Eye makeup plays a major role in balancing a round face. The right techniques draw attention upward and create the illusion of length.
- Winged eyeliner is the single best eye look for round faces — the upward flick at the outer corner lifts the eye and elongates the face
- A defined arch in your eyebrows adds vertical structure that balances the horizontal fullness of a round face
- Apply darker eyeshadow at the outer corners and blend inward — this creates depth and draws the eye outward
- Avoid heavy liner on the lower lash line — this closes off the eye and makes the face look rounder
- Mascara on the upper lashes only helps elongate the eye vertically
💡 Pro Tip: Well-groomed, slightly arched brows are one of the most powerful tools for a round face. They add immediate structure and lift without any other product.
Step 4 — Lip Makeup
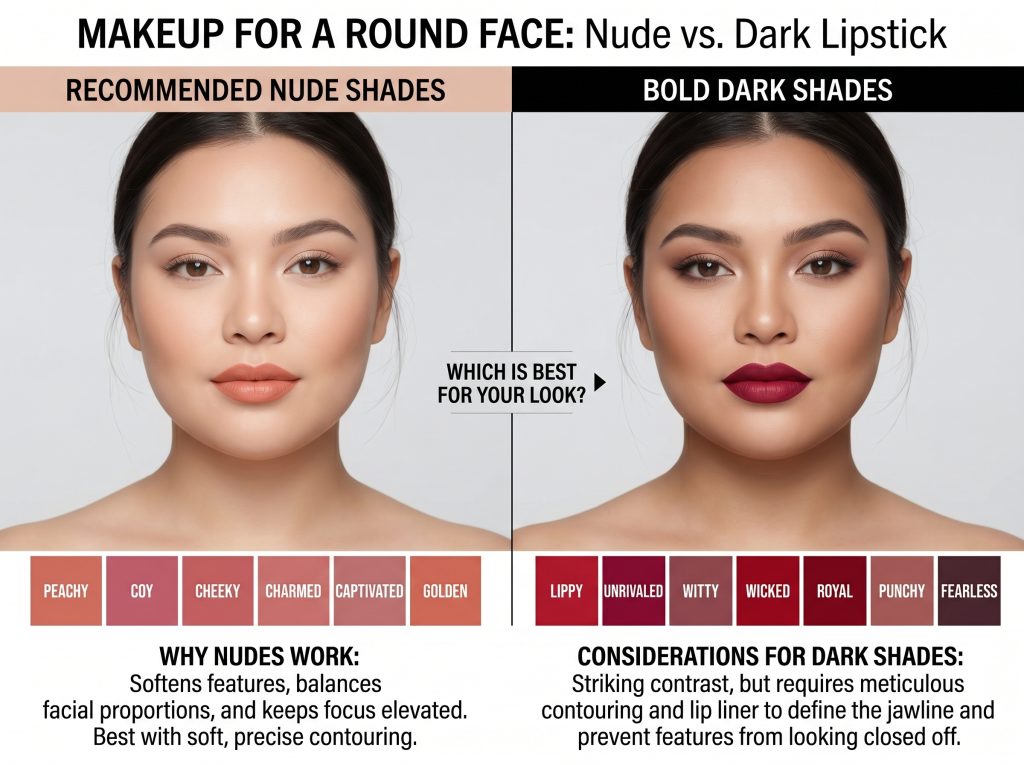
Lip color choice and application can shift the focus of your entire look. For round faces, both bold and nude lips work — just in different ways.
- Bold lip colors (red, berry, deep rose) shift attention to the center of the face and away from the width of the cheeks — perfect for evenings and events
- Nude lip colors create natural balance and let your contour and eye makeup do the heavy lifting
- Avoid lip liner that overlines the outer corners — this makes the mouth look wider
- A subtle cupid’s bow definition with lip liner adds structure to the lip without widening the face
👉 Both bold and nude lips work beautifully on round faces — choose based on how much attention you want on your lip vs your eyes.
Everyday Makeup Look for Round Face
Not every day calls for a full contour routine. Here is a simple, quick everyday look that still creates definition without feeling heavy or overdone:
- Tinted moisturizer or light foundation for a natural base
- Very light contour just below the cheekbones — use a soft brush and a light hand
- High blush placement in peach or soft rose, blended toward the temples
- Defined and groomed brows with a brow pencil or powder
- One coat of mascara on upper lashes
- Nude or soft pink lip color
This 6-step routine takes under 10 minutes and creates a polished, structured look that is perfect for work, school, or daily outings. The key is placement, not product quantity.
💡 Pro Tip: On days when you are short on time, prioritize brows and high blush placement. These two steps alone create more definition than any other combination.”
👉 Also Read: Oval Face Makeup Tips for Beginners — see how techniques differ between face shapes.
Best Affordable Products for Round Face Makeup
You do not need a large budget to achieve a beautiful, defined look. Here are reliable and affordable recommendations for each step:
Foundation (Matte Finish):
- Maybelline Fit Me Matte + Poreless — lightweight, controls shine, wide shade range
- NYX Can’t Stop Won’t Stop Full Coverage Foundation — long-lasting matte finish
Contour:
- e.l.f. Cosmetics Contour Palette — affordable, blendable, two shades included
- NYX Professional Makeup Highlight and Contour Pro Palette — great for beginners
Blush:
- Milani Baked Blush in Luminoso — warm peach tone, universally flattering
- NYX Professional Makeup Blush — soft pigmentation, easy to blend
Highlighter:
- Wet n Wild MegaGlo Highlighting Powder — subtle and natural-looking glow
- e.l.f. Halo Glow Liquid Filter — buildable, skin-like luminosity
Eyeliner:
- Maybelline Hyper Precise All Day Liner — precise tip, easy to create a wing
- NYX Epic Ink Liner — bold, waterproof, stays all day
Lip Color:
- NYX Soft Matte Lip Cream — comfortable, long-wearing, wide range of shades
- Revlon Super Lustrous Lipstick — classic formula, widely available
Common Makeup Mistakes to Avoid for Round Face
Even with the right products, placement errors can work against you. Here are the most common mistakes and exactly how to fix them:
Blush on the apples of the cheeks
This is the single biggest mistake for round faces. It emphasizes the fullest part of your face. Always apply blush higher and blend toward the temples.
Heavy foundation layers
Thick foundation sits on top of the skin and makes the face look puffier and heavier. Use a lightweight or medium coverage formula and build only where needed.
Contour without blending
Unblended contour looks like a visible brown streak, not a natural shadow. Always blend thoroughly using a fluffy brush in circular motions until no harsh lines remain.
Highlighting the center of the cheeks
Highlight on the fullest part of the cheeks makes the face look even wider. Keep highlight on the high points — brow bone, nose bridge, and upper cheekbone only.
Skipping brow definition
Undefined brows on a round face remove the only natural angular element from the upper face. Even a simple brow pencil used lightly makes a significant difference.
Heavy lower lash liner
Thick liner on the lower waterline closes off the eye area and makes it look smaller, which emphasizes the roundness of the face. Use a nude or white liner on the lower waterline instead to open up the eye.
Frequently Asked Questions
Q: How can I make my round face look slim with makeup?
A: The three key steps are: apply matte contour below the cheekbones and along the jawline, place blush high on the cheekbones blending toward the temples, and use a winged eyeliner with defined brows. These techniques together create a slimmer, more defined appearance.
Q: Is contouring necessary for a round face?
A: Contouring is not absolutely required, but it is the most effective technique for creating definition on a round face. Even a very light, soft contour makes a noticeable difference. Start with a light hand and build up gradually.
Q: Which foundation finish is best for a round face?
A: A matte or satin finish foundation works best. Dewy or luminous foundations reflect light and can make the face look fuller. If you love a dewy finish, apply it only to the high points of the face and use a matte powder on the cheeks.
Q: Should round faces avoid blush entirely?
A: No — blush is absolutely fine for round faces, but placement is everything. Apply it high on the cheekbones and blend diagonally toward the temples. Avoid placing blush on the apples (center) of the cheeks.
Q: What eye makeup looks best on a round face?
A: A winged eyeliner with a slight upward flick is the most flattering eye look for round faces. It draws attention upward and creates a lifting effect. Defined, slightly arched brows also add significant structure to the face.
Q: Can I wear bold lipstick with a round face?
A: Yes! Bold lip colors like red, berry, and deep rose actually work very well on round faces. They shift attention to the center of the face and away from the width of the cheeks. Pair bold lips with soft eyes for a balanced look.
Q: How is round face makeup different from oval face makeup?
A: Oval faces need minimal to no contouring because they are already balanced. Round faces benefit from more deliberate contour and blush placement to create definition. Eye makeup techniques like winged liner are especially important for round faces to add vertical structure.
Related Articles You Might Like
- Oval Face Makeup Tips for Beginners — Complete Step-by-Step Guide (Published)
- Natural Makeup for Beginners — A 5-Minute Daily Routine (Coming Soon)
- How to Find Your Face Shape — Complete Guide (Coming Soon)
- Daily Skincare Routine for Glowing Skin
- How to Find Your Skin Undertone — Warm, Cool, or Neutral?
Final Thoughts
A round face shape is naturally beautiful, soft, and youthful. The goal of round face makeup is never to hide or change your features — it is simply to add the definition and structure that enhances what is already there.
The three techniques of contouring, high blush placement, and strategic highlighting work together to create a more sculpted, lifted appearance. Combined with defined brows and an upward-flicking eyeliner, these steps can transform your look in under 15 minutes.
Start with the everyday routine first and practice the placement until it feels natural. Once you are comfortable, you can layer in more techniques for special occasions and events. The key is consistency — the more you practice, the faster and more confident you will become.
💬 Which technique made the biggest difference for you? Share your experience in the comments!